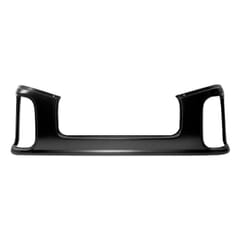
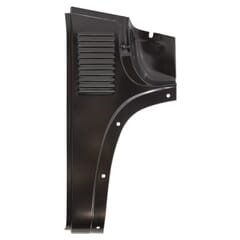
(1949-54) Rear Lower Cab Outer Panel
- 1949-1954 Chevy Truck
- 1949-1954 GMC Truck
- 1955 First Series Chevy Truck
- 1955 First Series GMC Truck
Product Description
Note:
Sheet Metal parts are "Replacement" body parts that are usually made overseas and are designed to repair damaged or rusted out areas of your vehicle. Having traveled by Ocean Freight and then by Rail and/or Truck there may be a few scratches or small dents. This cannot be avoided and should be expected. A small amount of body work or repair may be required.
Installation Tips:
Before installing a replacement body panel, first hold up the replacement panel and see how much it will replace. If the damaged panel suffers from rust, you need to make sure you cut out all the rust. If the replacement panel would replace more than is necessary, trim the replacement panel to replace only what is needed, so that you can retain as much of the original metal as possible. By doing this, you assure that you'll be able to weld to good metal, should you ever have to perform this repair again. Before you begin to cut out the damaged panel, be sure to make reference marks and take measurements. These will allow you to fit up the replacement panel. Once you have your reference marks and measurements, cut out the damaged panel.
Once you have completely cut out the damaged panel, trial-fit the replacement panel. Often you will have to trim, bend, and hammer the replacement panel to get it to fit. Make sure to use your measurements and reference marks to properly fit the panel. Once you are happy with the panel's fit, use a panel-holding system, rivets, vise grips, or sheet metal screws to hold the panel in place. Before you start to weld, double-check the fit and alignment. Once you are completely satisfied with the fit, begin to tack-weld the panel into place, making welds every few inches. Take your time, and jump between the welds to fill the gaps. You want to make sure that you do not heat up one area, or you could seriously distort the metal. Once you have the panel completely welded-in, use a flap disc on your angle grinder and grind down the welds. Again, be careful not to heat up one area, or you may distort the metal.
Once you have the welds ground down, wipe the panel down with a Painting Prep to remove any contaminants from the surface. Now you can apply a seam sealer to the seam, or you can use a body filler to blend in the repair. Once you have seam-sealed or blended the repair with filler, you are ready to prime and finish the repair with paint or undercoating (depending on the repair).
If you do not have a welder, or do not want to risk distorting the metal by welding the repair, you can attach it with rivets, screws, or patch panel adhesive as a no-weld alternative.
Product Details
| SKU | 44-001 |
|---|---|
| Additional Fitment Information | 49-54 |